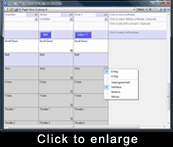
Each cell on the programming menu offers a range of programming options depending on the type of control it represents. For instance, buttons can be programmed with mouse commands, keystrokes etc, while axes can be programmed with ranges of movement or mouse movements etc.
To access the context-sensitive programming options, run your mouse cursor over the cell which corresponds to the button or axis you wish to program. You’ll notice an arrow appears at the top right of the cell – click on the arrow to open the context-sensitive programming menu. There are three main programming menus: button, POV and Axis. As mentioned earlier, shift buttons also have a programming option but this is only latched or not latched.
Button programming options
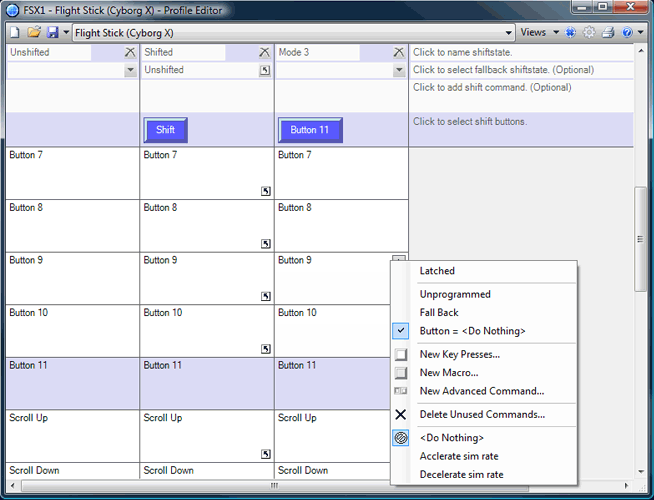
 Latched enables the button to behave like a ‘keypress repeat’ if a command has been assigned to that button. For example, if the shift button has been assigned to the controller button and then set as latched, it will behave like a keyboard caps lock key so that you press it once to lock it and press again to unlock it. You’ll notice that if you’ve already created a new shiftstate which is initiated by pressing a dedicated button, that button is now treated as a shift button by the Profile Editor and can only be programmed as Latched or not Latched, just like the dedicated Shift button.
It's generally not a good idea to program a button as latched unless you want to set up a command which continuously repeats until stopped by you.
Unprogrammed removes any programmed command and makes the button behave like a normal game controller button.
Button = this is the keystroke(s) the button has been programmed with.
Fall back - By default, any commands that you program to a button in the basic mode or shiftstate will automatically be carried over to the other modes or shiftstates. This is the case when Fall back is ticked.
You will probably want to assign different commands to individual buttons in different modes. To do this, type a new keypress or sequence of key presses in the button cell.
New Key Presses: enables you to input keystrokes for a new command, just like the above examples.
A button can be programmed with an individual keypress, can be unprogrammed, or Fall back to the keypress of another mode or shiftstate. By default, other modes or shiftstates Fall back to Mode 1. However, you can assign them to Fall back to other modes or shiftstates as explained below.

New Macro
A macro is a sequence of keystrokes that can be executed with the single press of a button. At first you might think that this is exactly the same as the multiple keystrokes assigned to a button but this isn’t the case.
In order for the multiple keystrokes not programmed as a macro to happen you have to keep the assigned button held down until all of the commands have activated. But if the sequence is programmed as a macro then you would just have to press the assigned button once and the keystrokes would activate automatically.
To create a macro, right click on the button cell to which you want to assign the macro and then select New Macro from the drop-down menu. You’ll see the cursor flashing in the cell, just like for a basic command.
Now input your keystroke sequence, exactly as you would input it in the game using the keyboard. You will notice that the keys are shaded to indicate that they are part of a macro and not just a basic keystroke sequence. Click the green tick mark when you have finished inputting your chosen macro sequence. Just as with keystrokes, the editor will prompt you to name your command. When you have named the macro, hit the return key on the keyboard.
Tip: A macro can't be interrupted except by pressing another command on the controller. However, a simple sequence of keystrokes, can be interrupted by releasing the button. This could be important depending on the game you're playing.
As with basic keystroke sequences, the delay between macro keystrokes will be exactly as you have input them, unless you choose to change the sequence timings. This is explained below.
New Advanced Commands
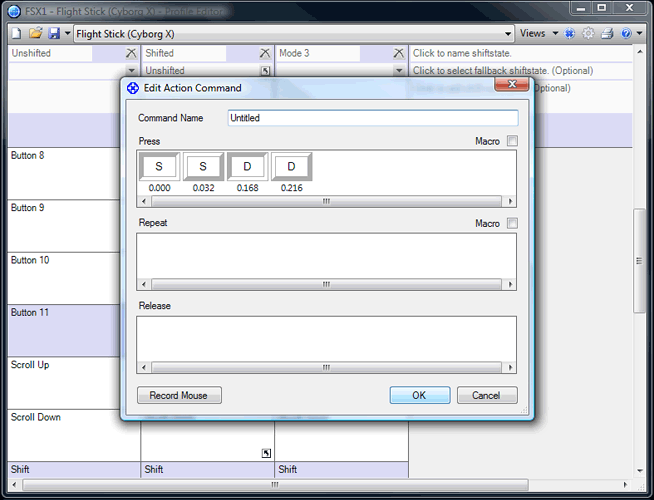
When you select the New Advanced Command option a new window opens with three sections. Each section represents a different state of the button to which you are assigning the Advanced Command. Any keystroke sequence in the Press row will happen when you press the button the command is assigned to.
Any keystrokes that are in the repeat row will happen as long as you keep the buttonto which they are assigned held down.
Any keystrokes in the release column will happen as soon as you release the button that the Advanced Command is assigned to. However, the difference with the release row is that, by default, any multiple keystrokes will act like a macro and happen automatically without you holding any keys down.
Unlike the other keystroke input windows, when pressed, each key places two instances of the key in the command input window. This is because when you press a key on a keyboard it actually produces two signals - one when you press it and another when you let go.
 Unlike the other views of keystroke sequences, you will notice that each keypress has a figure underneath which represents the time in seconds from when you pressed the first key in the sequence. In the example you can see that the S key was held down for 0.032 seconds and the D key for 0.048 seconds (0.216 -0.168) .
For example, with the Advanced Editor you could set a command that launches a missile when you press the button. It might then switch to a camera view of the missile and then 4.5 seconds later switch to a camera view of the enemy. When you let go of the button it could switch back to your cockpit view.
This is just a hypothetical example but it gives you an idea of the possibilities open to you with the Advanced Editor.
Tip: You can easily set the sequence of keystrokes to function as a Macro by ticking the Macro box at the top right of each row.
Tip: To adjust the keystroke sequence timings, left click on the key you wish to adjust, then right click and select Set Delay. Now enter the exact time after at which you want the keystroke to activate. Note, this is the time elapsed since the first key in the sequence was pressed.
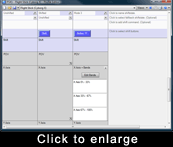
Delete Unused Commands: When programming keypresses to buttons you may create more commands than you actually end up using. When you're happy with the commands you've input for all the buttons in all the modes and shiftstates, if you click on Delete Unused Commands the programming software will detect and list all commands not in use and give you the option to delete them. Please note, you can only delete the commands you have created.
The commands we have created previously are listed beneath the Delete Unused Commands menu item. We can either reuse these when programming other buttons, or choose to delete them individually or all together.
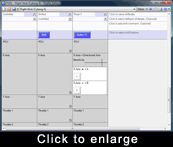
POV (Point-of-View) Programming Options
Most controllers supported by SST have a Hat, or POV switch. On the joysticks and pads a POV switch is usually used as a device for looking through the different views from a cockpit in a flight sim or first person shooter game, but you can assign it to do whatever you want. If left unprogrammed, the POV switch will act as either a default POV or a set of four buttons, depending on the direction in which it is pushed, but this can easily be changed.
To start programming the POV simply put your mouse cursor over the cell of the POV you wish to program. You'll notice that an arrow appears in the top right corner of the cell. Click on it and a drop down menu appears.
 Like the button commands, you can select Unprogrammed or Fall back. You also have the option for the POV to operate as either a set of programmable buttons (the number of which is selected by choosing 8 way or 4 way), or as a mouse.
If you choose the POV to function as a mouse you can set the sensitivity of both mouse axes with the central slider or set the sensitivity of the individual axis of movement with the slider controls for horizontal and vertical movement.
Axis (rotaries, thumb wheels etc) Programming Options
The final parts of your controller that can be programmed are the axes. These are basically anything that has a range of movement on your controller such as a rudder twist, throttle lever or rotary switch.
 You can program the axes on your controller with keyboard commands, just like buttons and hat switches. Generally speaking, the main axes of a controller should be left to work as axes, simply because most games detect these by default anyway. However, some games don't support controllers at all (so you could then configure the stick to pretend to be a part of the keyboard for example) and programming the axes would allow you to make the controller work in the game where otherwise it wouldn't.
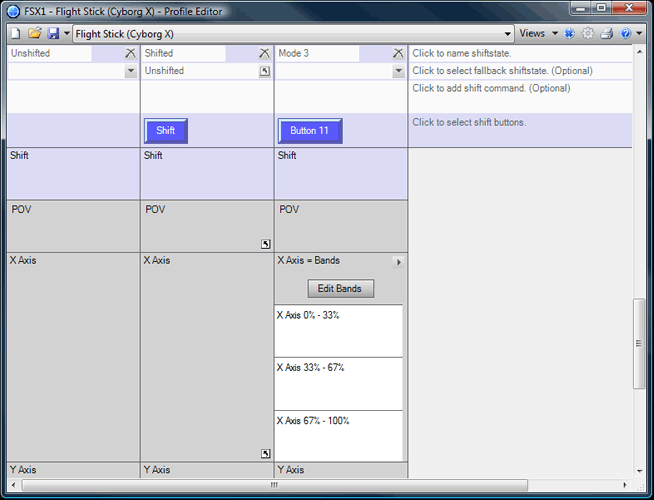
The first step for programming an axis is to set it to banded mode. In the Profile Editor right click on the appropriate axis (or left click the small arrow on the right of the axis cell) and choose Bands from the drop-down list. The cell will now be split horizontally into three equal bands each occupying 33% of the cell.
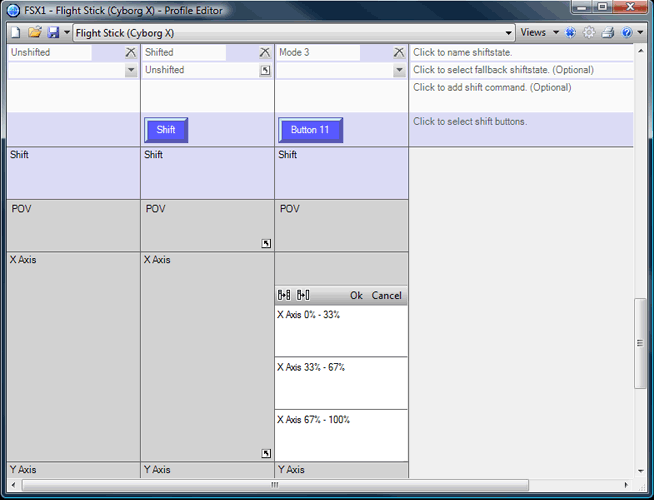
 To edit the range of the bands, click on Edit Bands and your mouse cursor will change shape so that it looks like a horizontal line with a vertical, double-headed arrow running through it. At the top left of the cell there are two icons resembling two letter “H”s. The icon on the right clears all the bands and the icon on the left distributes the bands evenly in the cell. If you want the cell to have less than three bands, click the Clear bands icon on the right and then click your cursor in the cell where you want the band to appear. You can adjust the position of each putting your cursor exactly over it, clicking and dragging the band to the desired position. Alternatively, if you want the bands to be evenly spaced, click on the “Space evenly” icon on the left. When you are happy with the number and position of the bands you’ve created, click OK. Once you have clicked OK you can program keystrokes, macros or advanced commands to the areas just like any button on the controller.
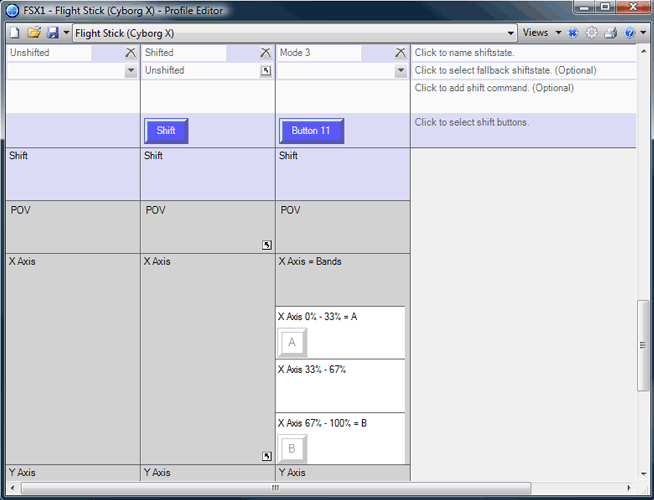
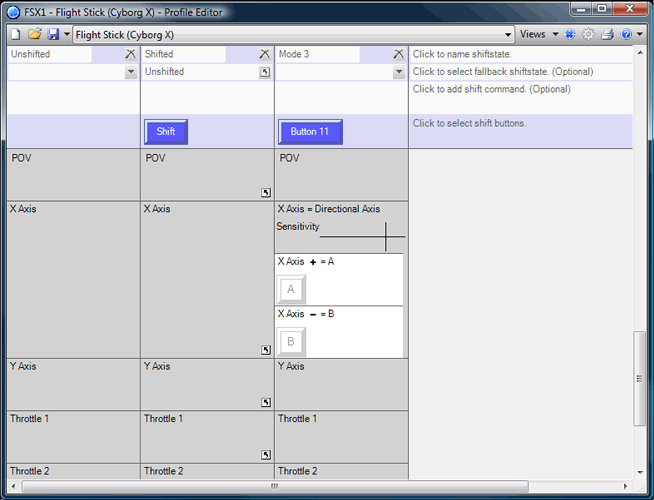
 In this example we'll create a simple program where moving throttle 1 of our Cyborg X will give an 'A' keystroke and moving it in the other will give a 'B' keystroke. First we need to create a split point at the 70% mark on the axis' scale. Now we’ve created a second split and clicked the Space evenly command to give us 0-33%, 33-67% and 67-100%. Now click OK to set those split positions in place. In the top band we’ve input the A keystroke and in the bottom band, the B keystroke.
Why didn't we just create one split so that the axis area was split in half and then just assign the keystrokes to the two areas? Because we need a position where the axis is 'at rest' and isn't issuing any keyboard commands. In this example no commands are assigned to the middle position of the area. This is because no matter which controller you have or which axis you are programming, you must always have a band at the middle of the axis movement with no command assigned to it - commonly called a deadzone. You can create as many splits as you want but too many can become complicated.
Directional Axis
 You can also program an axis to initiate different keypresses depending on which direction it is moved in. To do this, select the cell as above, and choose Directional axis. You can then program keystrokes to each direction of movement for that axis. The sensitivity slider allows you to alter how often the programmed keypress is made for a certain range of movement of the axis.
Mouse Emulation
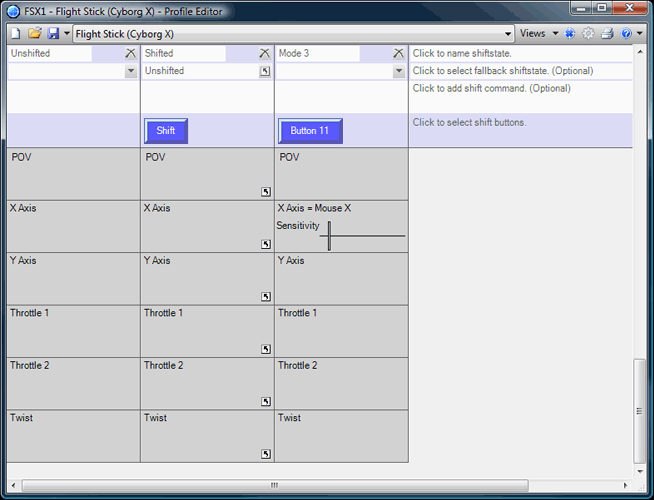
 You can also program an axis to emulate the movements of the mouse cursor. To do this, right click the axis you want to become a mouse movement.
Click the Mouse X Axis option to make that axis control the left/right movement of the mouse and the Mouse Y Axis option to make it control the up/down movement. Once one of the Mouse Axis options is selected you will see a slider bar which controls the sensitivity of the mouse movements; the far left setting the slowest, and the far right-setting the fastest. Either drag the slider to the desired position or click on the scale where you want to set the sensitivity setting.
You can also program an axis to emulate the movements of the mouse cursor. To do this, right click the axis you want to become a mouse movement.
Click the Mouse X Axis option to make that axis control the left/right movement of the mouse and the Mouse Y Axis option to make it control the up/down movement. Once one of the Mouse Axis options is selected you will see a slider bar which controls the sensitivity of the mouse movements; the far left setting the slowest, and the far right-setting the fastest. Either drag the slider to the desired position or click on the scale where you want to set the sensitivity setting.
Tip: Some controllers such as the X52 and X52 Pro already have mouse axes controls. In these cases, if you want to program another axis to act as a mouse axis, you must first ensure that the default Mouse X and Mouse Y axes are unprogrammed.
Testing the Profile
When you have activated the profile you can test it. Click the Test Profile icon next to the Profile icon at the top right of the Profile Editor.
Saving the Profile
When you've finished assigning all the commands you want you must save the profile so that you can access it again later. As before, click the Save icon at the top of the Profile Editor, name your profile then click Save. The name of the profile should ideally be the name of the game for which you have created the profile. Do not change the location of the profile file - it must be saved in the directory that is already in the save window or a subfolder.
Activating the Profile
To activate the profile, click on the proflie icon at the top of the window, then close the Profile Editor. When you right click on the small controller icon next to your clock, You'll notice that the profile that you saved is at the top of the pop-up menu.
Click on your profile and you will notice that the small controller icon now has a green square behind it, indicating that a profile has been loaded into the controller.
If you wish to clear the profile from your controller at any point, simply right click the controller icon and click Clear Profile. The green circle will disappear indicating that the controller is now cleared of any commands.
You may also set a profile of your choice to automatically load into your controller at Windows start-up. To do this, right click on the small controller icon next to your clock to bring up the profile menu. Right click the profile you wish to set and select Set as Startup Profile. If you ever wish to clear this then select Clear Startup from the Profile menu.
Printing the Profile
Once everything is programmed into your controller you may find yourself forgetting which commands you have assigned to each button, especially if you have used shift modes. To print your profile out, simply load it into Profile Editor and click the printer icon at the top right hand corner of your screen. However, please note that this will only be useful if you have named your commands as described in the simple keystrokes section of this guide.
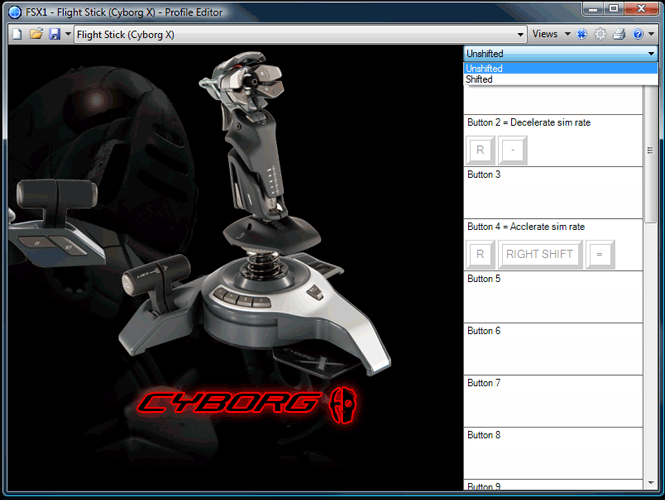 Using our Cyborg X example, you’ll see a drop down menu at the top of the cells on the right of the Profile Editor window which, when clicked with the mouse, gives the option of “Unshifted” or “Shifted”. This is because our Cyborg X controller features a shift button which allows two functions to be programmed to each button or axis. We have been programming the cells in the unshifted state. If we select “Shifted” from the drop down menu, we can now program all the controls with a second set of commands which will be accessed in-game when pressing the Shift button on the controller. Every controller will have a different method of changing between shiftstates, either using a mode switch or a pre-specified "shift" button.
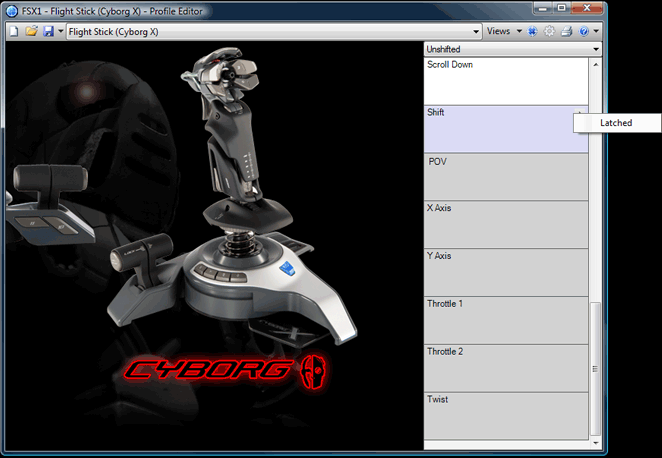 You’ll notice when you click on the Shift button cell in the Profile Editor that we can only program our Cyborg X’s shift button to be latched or unlatched. If we leave it unlatched we will have to press and hold it in-game to access the second set of programmed control commands; if we change it to “Latched” we just have to press it once to switch to the set of shiftstate commands and press it once again to return to the unshifted commands.
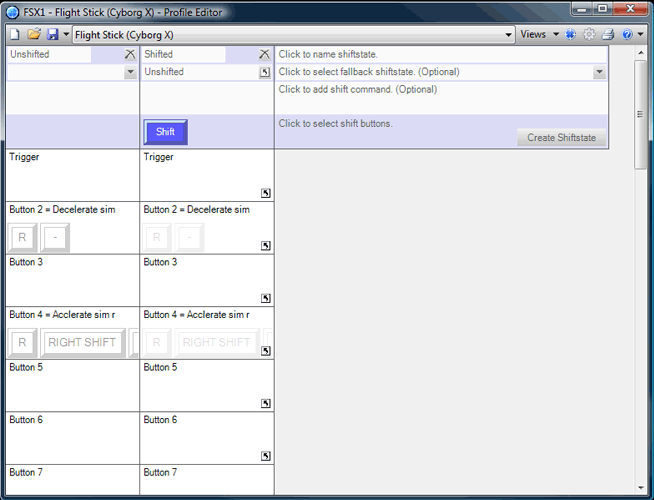 To view shiftstates in grid form with programmed commands presented side by side, click on the Views drop down menu at the top of the Profile Editor and select Grid View. You should now see the columns of Shifted and Unshifted cells. Each column of cells contains a set of commands which are assigned to your controller's buttons in each shiftstate.
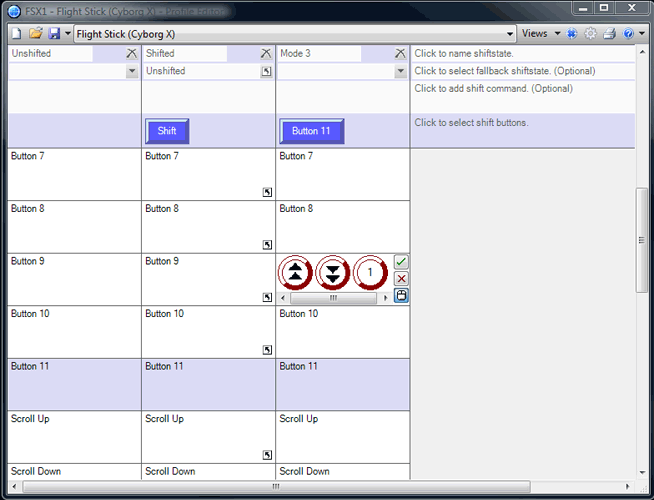
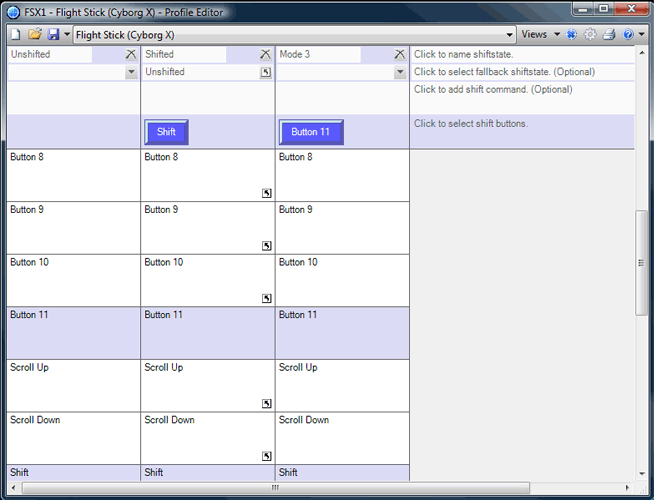 A really useful feature of the Saitek Programming Software is that you can create additional shiftstates for controllers with shift or mode buttons, or shiftstates for controllers that do not have a shift or mode button. To do this, go to the far right column and click Create Shiftstate. You will be prompted to name the new shiftstate. In order to actually use this mode we need to select which button on the controller will activate it. Left click on the cell to the left of Click to select shift buttons - a drop down menu will appear with all the buttons available on your controller. Simply select the button which will activate this shiftstate. In the example below we have selected Button 11. Note - any button which you select as a shift button will no longer be programmable with normal commands. This is to avoid conflicts between the functions of buttons in different shiftstates.In the example below, we have named it Mode 3.