You should already have installed the SST software and plugged in your controller for the first time. If you haven't, install the SST software from the Saitek website or installation disc and then plug the USB cable of your controller into one of your computer's free USB ports.
When you have plugged your controller in, the Profiler icon will appear in the taskbar next to your clock every time your controller is plugged in. 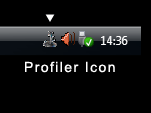 The Profiler icon could be a joystick, wheel, gamepad etc depending on which controller is plugged in. If you have more than one Saitek controller plugged in at the same time, you will have a separate icon for each controller. When you hold your mouse cursor over the small icon a pop-up tooltip will tell you to which controller the icon refers.
We’re using a Saitek Cyborg X Flight Stick for our example so the Profiler icon looks like a Cyborg X stick.
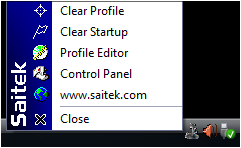
Profiler menu
Left-click on the Profiler icon to open the Profiler menu window. We’re going to create a profile first so click on the Profile Editor command. You can also launch the Profiler by clicking Start>All Programs> Profile Editor.
 Advanced Tip :
- Clear Profile is used whenever you want to completely clear one of your controller profiles.
- Clear Startup clears a profile which has been set up as start-up profile .
- Control Panel opens the test and calibration screen for your controller.
- www.saitek.com opens your browser and takes you to the Saitek website.

Profile editor
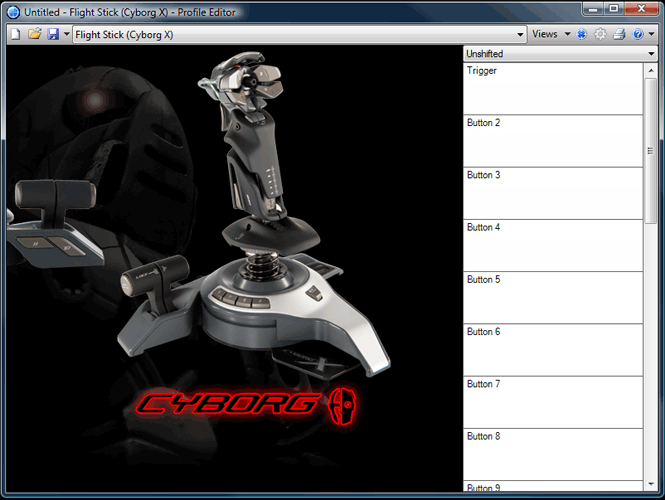
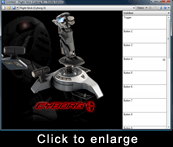
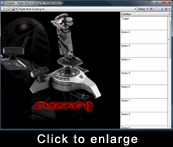 The Profile Editor automatically recognizes the controller you have plugged in and opens the window left showing a picture of the controller on the left and a list of its buttons and axes on the right. Our example uses the Cyborg X stick so the window shows the Cyborg X and its available buttons and axes. You can select another controller from the drop down menu at the top of the screen if you want to create a profile for another controller plugged into your PC or when no controller is plugged in
(note: you can create and save a profile without a controller plugged in but you cannot test or profile it)
Move your mouse cursor over the buttons and controls of the controller in the picture - each button or part of the controller is highlighted when the mouse cursor is over it. This means that the button or control can be programmed and there is a cell for the button or axis on the right of the screen in which you can create a keyboard command.
 You will notice that your mouse cursor changes to a hand when it is positioned over some of the buttons. If you left click your mouse when the hand is positioned over a button it highlights the corresponding cell on the right of the screen, ready to be programmed.
You can also press the buttons or move the axes on the controller itself. This automatically highlights the cell on the right, ready to be programmed.
Programming a keyboard command to a button or control
In this example, we’re going to program a very simple command to help when flying a plane in Microsoft FSX. We want to assign a simple command to our joystick buttons to speed up or slow down the simulation rate to speed up time when flying long distance. In FSX, simulation rate is increased by first pressing “R” on the keyboard followed by “+” or “-“.
 We‘ve decided to make button 4 on the Cyborg X speed up simulation rate and button 2 slow down the simulation rate.
First, either press button 4 or click on it on the picture of the controller on the left of the window. This will highlight the button 4 cell on the right of the window. Left click on the highlighted cell with the mouse.
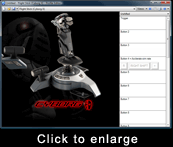
 A cursor appears on the left of the cell as shown, indicating that you can input a keystroke. We’ve typed “R” followed by “shift” and “+” (held down at the same time) – the combination of commands which will accelerate simulation rate in FSX. Now click the green tick to the right of the cell to indicate you’re happy with the keystrokes you’ve input.
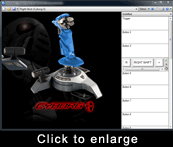
 You’re now prompted to name the command. We’ve named our command “Accelerate sim rate”. Hit return when you’ve named the command. The cell now displays “Button 4 = Accelerate sim rate”. If you have made a mistake in naming the keystroke or want to change it, highlight the text and edit it or right click and click Delete.
If you want to delete one of the keystrokes you have programmed, click on it and hit delete on your keyboard or right click on one of the keystrokes and select Delete from the menu. If you want to delete all keystrokes, select Delete All.
The software is now telling us that button 4, when pressed, will initiate “R” and “+” – the FSX command to accelerate simulation rate.
You have just created the first command for your controller.
Testing the profile
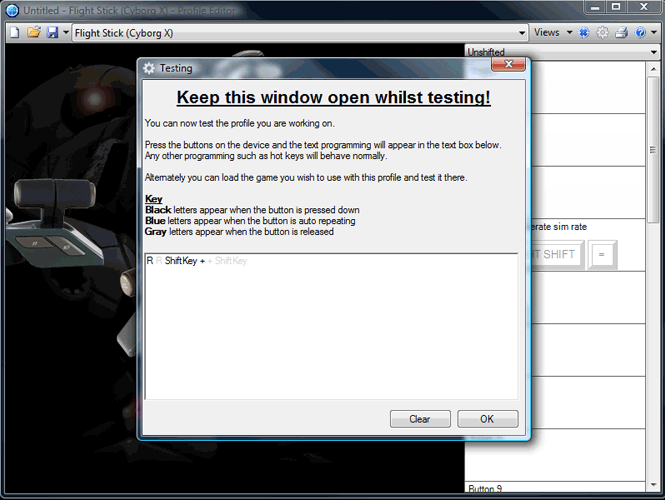
To test the command, click the Test Profile icon at the top of the Profile Editor Screen.
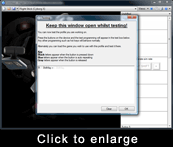 This opens the testing window. Press the button or control you’ve programmed and you will see the command you’ve created. In our example, pressing button 4 on the Cyborg X initiates “R” followed by “Shiftkey” and “+”. The grey “R” and “+ Shiftkey” mean the “R” and “Shiftkey” keystrokes will also be released after being pressed.
 We also want to program button 2 to slow down the simulation rate. Once again, we press button 2 on the controller or click on button 2 on the picture of the controller to highlight the button 2 cell on the right (or just click on the button 2 cell). When the cursor is blinking we type the decelerate simulation rate command “R” followed by “-” and click on the green tick. We’ve named the command “Decelerate sim rate” and then hit return. Opening the profile tester and pressing button 2 on the joystick shows the command is correct. Click on OK to return to the Profile Editor.
At this stage you may wish to print your profile as a quick reference to the commands you’ve programmed. To do this, click the printer icon at the top of the window.
Saving the profile
To save this very simple profile, click on the Save icon at the top of the window.
You will be prompted to name the profile and save it in the folder which contains all the profiles you’ve created – “Saitek SD6 Profiles”. We’ve called our profile FSX1. Next, to load that profile for your controller, click on the profile icon at the top of the window
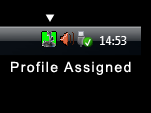 You’ll notice that the controller icon at the bottom left of your toolbar now has a green background. This is to show that you have assigned a profile to that controller.
Whenever you plug your controller in for the first time, to start using the profile, click the controller icon, and select the profile you have created – “FSX1” in our example. Now, when we launch Micosoft FSX, button 4 on the Cyborg X will accelerate the simulation rate and button 2 will decelerate it.
The profile we have created is very basic but shows the main principles of creating profiles using SST. Saitek has created useful profiles for most major PC games which are available to download from www.saitek.com. Although these profiles use most of the features of the SST software - and can be quite complicated - even if you’re new to programming using SST it’s still a useful exercise to load a sample profile for the game you want to play on your controller and then edit according to your preferences.
 , in the Profile Editor, to check you buttons are responding correctly.